
How to Use Gmail (not G Suite) with Your Domain
The Evil of Email Forwarders
When an email forwarder is created, all email is forwarded to that address. Bills, invoices, Twitter notifications, those hilarious cat videos from Bob in the cubicle just over the way, and spam. Our IP addresses are then sometimes blocked by third-party providers, such as Google, ATT, Hotmail, and others, due to the volume of mail being sent from them or the spam that is being forwarded from your account(s). 
While the spam may not have originated from your email account and is only being forwarded, email providers do not care. They only care about preventing spam from reaching their mail servers. This is why, if you prefer to use Gmail (or whichever third-party email provider you utilize) for all your mail, we always suggest setting up your domain email accounts as POP accounts rather than forward every message from your account.
POP accounts, by default, download the messages from the server. They can be configured to leave a copy on the server but I generally advise against that. IMAP accounts are a direct connection to the server in which you make changes (mark as read, delete, move to different folders) on the server itself. Mail does not get downloaded to the email client being used.
Benefits of using POP in Gmail
- We never block Google’s IP addresses.
- You can continue to use the amazing Gmail interface to read and respond to your emails.
- You will even be able to respond as your domain-based email address rather than using your Gmail address.
- Spam messages will no longer be forwarded from the server (but rather retrieved by Gmail) which will help lower the chances the server being blocked by Gmail for sending spam.
- Even if you are using something other than Gmail, if you can set up the account as a POP account in that email (Yahoo!, Outlook, Hotmail, etc…), the same concept applies of less spam being sent from the server.
Potential Downsides
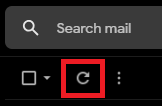
The only potential downside we can come up with is that Gmail checks periodically (about every hour or so) so you may need to wait for it to automatically pull your new messages. Alternatively, you can initiate a fetch-request by clicking the Refresh icon within Gmail, not your browser Refresh icon.
Let’s Set It Up!
- Log into your Gmail account.
- Click the settings icon (gear) in the top right and then click Settings.

- Click the Accounts and Import tab.
- In the Check mail from other accounts section, click Add a mail account.
- Enter your email address and click Next.

- Select the default option (POP3) and click Next.
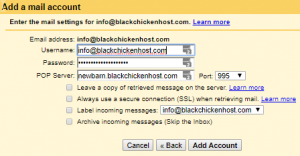
- Change the Username to your full email address and enter the email account’s password.
- Change the POP Server to your server’s hostname, generally something like river.blackchickenhost.com. If you’re not sure what your server’s hostname is, please reach out to us!
- Select port 995 and check the box for Always use a secure connection (SSL) when retrieving mail.
- Click Add Account.
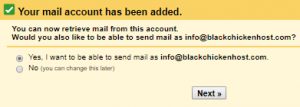
- Once your account has been added successfully, you can set up the email address so you can send mail from that account. Click Next.
- You can change the Name if you wish, this is what will be displayed when sending messages from this email address. Be sure to leave the Treat as an alias box checked.

- Use your server’s hostname for the SMTP Server, ensure you use your full email address for the Username, and enter your Password. Leave the Secured connection using TLS option selected and click Add Account.

- The email address you are adding to your Gmail account will receive a confirmation code to enter here.
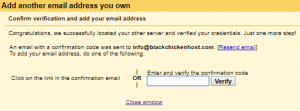


You should now be able to send and receive your domain-based email through your Gmail account!
As always, please do not hesitate to contact us if you have any questions or concerns or just want to chat!